
Hi there! I have the pleasure of being one of the stops on the blog tour for the M is for Moto Joggers from Hatchlings Patterns. I love that the jogger pant trend is still going strong. I have a few pairs of me-made knit pants that are starting to be on their last legs because they get so much wear. I am not much of a leggings person (unless I am wearing them to work out or under a dress in an attempt to avoid wearing tights) so this style of pants is great for days when I want to wear something super comfortable that isn’t my pajama pants.
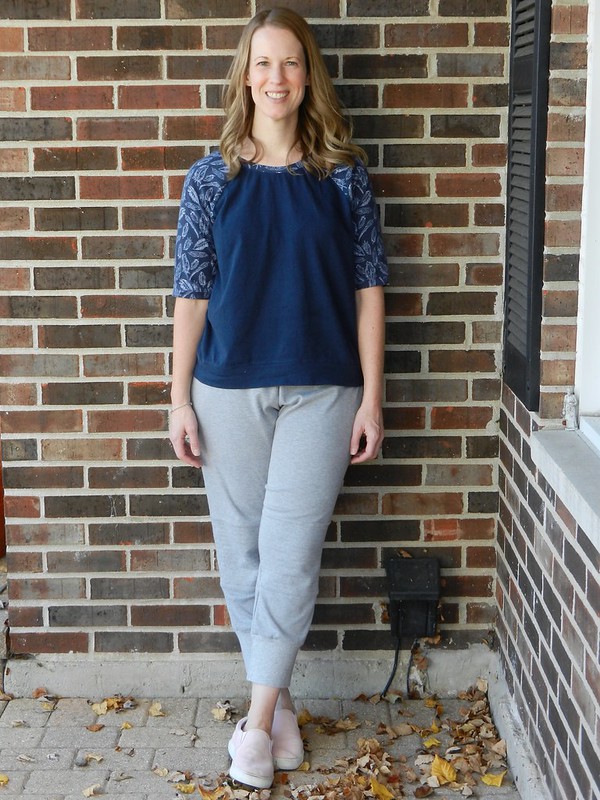
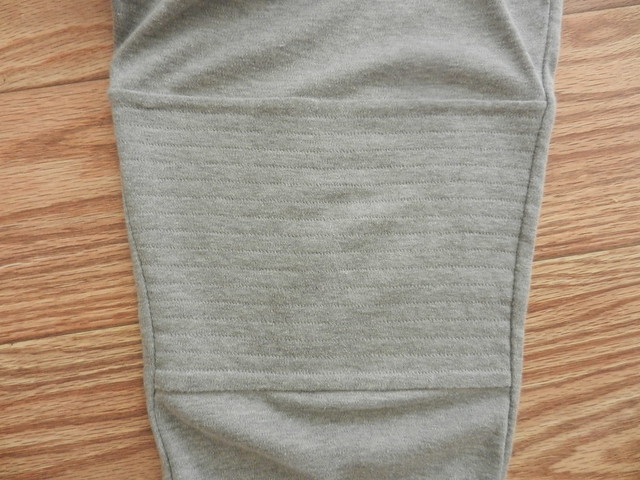
Right away I was drawn to the cool (optional) knee detail on the pants. It looks like a design that you’d find on ready to wear pants. The pattern comes with the option for 4 different lengths. I set out to make the full length pants with the knee detail, but I ran into a problem at the cutting stage. I didn’t pay enough attention to the width of my fabric when I bought it and I could not find a way to fit my pattern pieces on to my fabric. The only way I could make it work was to crop the pants by about 5 inches. This is sort of mid way between the full length and the cropped length of the pattern. I find that I usually pull up my sweat pants to a few inches above my ankle, anyway. My fabric mistake turned out to be OK, because I really like this length!

I love how the knee panel is attached. It is essentially a variation on the burrito method that is used to attach the inner and outer yoke of a button down shirt. All of the raw edges are enclosed for a nice clean finish. Unfortunately the rest of the seams on my pants are not nicely finished since my serger completely hated this fabric. I constructed the pants fully on my sewing machine with a zig zag stitch and my walking foot. I chose to use the stretch stitch on my machine for the rows of stitching on the knee panel instead of a longer straight stitch. I didn’t want to take a chance on popped stitches when I bend my knees.
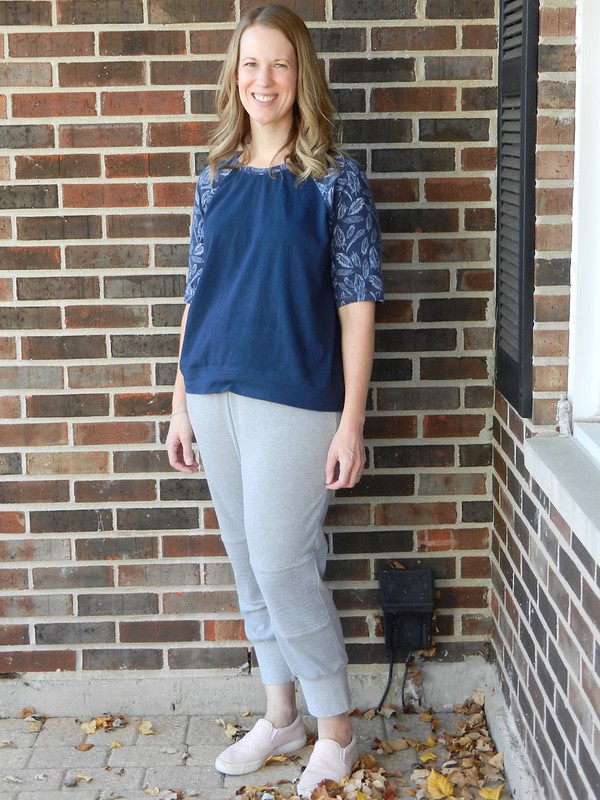
I left off the pockets to keep the pants a bit more steamlined and not add bulk to my hips. I ended up lowering the rise by about half an inch. This was unplanned, but I made the ridiculous mistake of attaching the knee panels to the waist on one of the legs. I was so annoyed when I realized what I’d done! I did not want to unpick so I cut the panels off of the top and shortened the rise of the other pieces to match. I like where the rise hits on me now so it was another happy accident.

If you can avoid making silly mistakes this is a really quick sew! There isn’t a separate waistband to cut out. The elastic is attached directly to the top of the pants then folded over and topstitched. There is an option for a faux drawstring but I left if off since I knew I wouldn’t be tucking anything into these pants. I think the reinforced knee panel is something that I will use the next time I make pants for my sons. My older son always gets holes in the knees of his pants and this would be a fun, stylish way to try to prolong the life of his pants.
I am super happy with my new pants and I think I will be wearing this very outfit quite often! I made this tee shirt earlier in the year and I’ve worn it over and over but it hasn’t made it to the blog yet. It is the cropped view of the Linden sweatshirt with added bands. It’s an idea I used after seeing this post from Kelly at Cut Cut Sew. (I think I should have made the neck band a little bit longer to eliminate some of the puckering at the neckband. Mental note for next time!)
I recommend this pattern if you’re in the market for some comfortable shorts or pants! (And it’s on sale through the end of the blog tour on October 31!) Thanks so much to Liz for having me as part of the tour! Please check out the other stops on the blog tour this week:
~Teri

Teri, these look great – I love the 7/8th look, I do the same thing with my sweat pants, always hitched up 🙂
LikeLike
Thank, Liz! I love calling it the 7/8ths look. That is really the length I prefer for most of my pants until it gets freezing cold! It was a fun pattern to sew!
LikeLike
Oh, I really like the detail of the knee panels. They just add such an interesting detail! Love!
LikeLike
Thanks, Fiona! I thought it was a really cool detail, too!
LikeLike
Looking good! I love the double knees! My sister used to double the knees 30 years ago for her little boys. It’s such a good idea!
LikeLike
It really is a good idea! I’ve done some knee patches before but now I want to give this a try. Anything to preserve the life of their pants!
LikeLiked by 1 person
Love the knee details, makes these look rather smart for sweatshirt pants. You’re right this detail would look great on boys’ pants too.
LikeLike
Next time I make some new pants for my older son I am definitely going to try this knee detail out. He is so hard on his pants and I want them to last long enough to get handed down to his younger brother!
LikeLiked by 1 person
Teri – great pants and helpful review. I love the idea to use the knee patch for your boys pants. I think I might try that too. I was kinda afraid that the knee patch wouldn’t look right on me, but I think I’m going to give it a try. Yours look great – I’m glad your mistakes turned out to be happy ones!
LikeLike
Thanks, Bethany! I really like how the knee patch looks and it doesn’t really feel any different than regular pants, either. I was a little worried that the doubled seams would feel sort of awkward. You should give it a try!
LikeLike
These look awesome Teri! I really like that leg detail!
LikeLike
Thanks, Heather! It was fun to try something new and the added benefit is that my knees are a little more cushioned when I’m down on the floor with the kids!
LikeLike
Very cute! The knee detail is definitely fun. How does the fit compare to the Hudsons?
LikeLike
Thanks, Noelle! I would say the fit through the legs is pretty similar to the Hudsons. These pants might be a touch slimmer through the upper leg. They are also higher waisted with a little bit of a drop crotch. I mostly eliminated that when I lowered the rise a little bit. I wasn’t sure that was going to be the best look for me. 🙂
LikeLike